Hello dear amigurumi followers, we add a new one to the free amigurumi pattern. You can always follow us to reach the newest, most popular, most accurate pattern. Here is Spring Bunny in Dress;

Designer: jaz_spring
We will start to make legs body and skirt.
Abbreviations
MR: Amigurumi Magic ring
sc : Single Crochet
inc : Increase
dec : Decrease
tr : Triple Crochet/ Treble Crochet
st: Stitch
dc : Double Crochet
hdc: Half Double Crochet
slst : Slip Stitch
ch : Chain
..in : make increase into same stitch as many as the number which is given in front of “inc” abbreviation (exp; 3inc, 4inc..).
FLO : Crochet into front loops only
BLO : Crochet into back loops only

Legs.
We start with a pink yarn.
1 Rnd: 6sc in MR
2 Rnd: 6 inc
3 Rnd: 1 sc, inc × 6 times (18 )
4 Rnd: 2 sc, inc × 6 times (24)
5 – 7 Rnd: 24 sc
Change color white and BLO
8 – 25 Rnd: 24 sc
Change color to pink.
26-27 Rnd: 24 sc.
We fix the yarn and cut it off.
We make the second leg in the same way.
Next, crochet 3 more sc and make 2 ch and connect with the first leg.
28 Rnd: crochet 52 sc
29 – 33 Rnd: 52 sc

Body.
34 Rnd: BLO 52 sc
35 Rnd: 12sc,dec,24 sc,dec,12sc (50)
36 Rnd: 50 sc
37 Rnd: 11 sc,dec,23 sc,dec,12sc (48)
38 Rnd: 48 sc
39 Rnd: 10sc, dec, 22sc,dec,12sc (46)
40 Rnd: 46 sc
41 Rnd: 9sc, dec, 21sc,dec,12sc (44)
42 Rnd: 44 sc
43 Rnd: 8sc, dec, 20sc, dec,12sc (42)
44 Rnd: 42 sc
45 Rnd: 5 sc, dec × 6 times (36)
46-47 Rnd: 36 sc
48 Rnd: 4 sc, dec × 6 times (30)
49-50 Rnd: 30 sc
51 Rnd: 3 sc, dec × 6 times (24)
52 Rnd: BLO 24 sc
Change color to white and make 24 sl st.

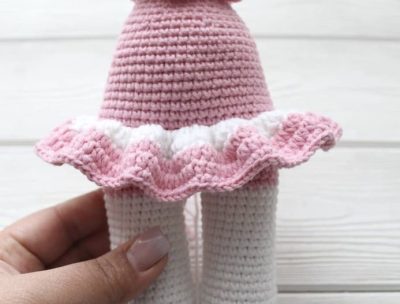
Skirt.
1 Rnd: In the 34th row, crochet in turn first 2 dc, and in the second loop 3 dc and so on until the end of the row.
2 and 3 Rnd: 130 hdc
4 Rnd: 130 sc
Collar
Also, in turn, we make 2 dc in the first loop, and in the second 3 dc and so on until the end (60).

Head
1 Rnd: For the loops of the previous row we make 24 sc
2 Rnd: 3 sc, inc × 6 times (30)
3 Rnd: 4 sc, inc × 6 times (36)
4 Rnd: 5 sc, inc × 6 times (42)
5 Rnd: 6 sc, inc × 6 times (48)
6 Rnd: 7 sc, inc × 6 times (54)
7 Rnd: 8 sc, inc × 6 times (60)
8 – 17 Rnd: 60 sc
18 Rnd: 8 sc, dec × 6 times (54)
19 Rnd: 7 sc, dec × 6 times (48)
20 Rnd: 6 sc, dec × 6 times (42)
21 Rnd: 5 sc, dec × 6 times (36)
22 Rnd: 4 sc, dec × 6 times (30)
23 Rnd: 3 sc, dec × 6 times (24)
24 Rnd: 2 sc, dec × 6 times (18)
25 Rnd: 1 sc, dec × 6 times (12)
26 Rnd: 6 dec.

Ears.
1 Rnd: 6 sc in MR
2 Rnd: 1 sc, inc × 3 times (9)
3 Rnd: 2 sc, inc × 3 times (12)
4 Rnd: 1 sc, inc × 6 times (18)
5 Rnd: 2 sc, inc × 6 times (24)
6 – 16 Rnd: 24 sc
17 Rnd: 2 sc, dec × 6 times (18)
18 Rnd: 18 sc
Cut the yarn and fasten off.

Arms.
1 Rnd: 6 sc in MR
2 Rnd: 6 inc (12)
3 Rnd: 2 sc, inc × 4 times (16)
4 – 6 Rnd: 16 sc
7 Rnd: 6 sc, dec × 2 times (14)
8 – 24 Rnd: 14 sc
Fold and crochet.

Flowers.
5 sc in MR
Next, sl-st and cast on 3 ch and crochet 3 dc, 3 ch and sl-st in the same loop.
Crochet the next petals in the same way.

Leaves 4 pcs.
We make 11 ch and in the 2nd loop from the hook, crochet sl-st, sc, 2 dc, 3 dc, hdc, sl-st. .
Tomorrow is assembly and decoration.
Assembly.
Step by step we begin to collect our toy.
First, we sew handles on the sides, right under the collar and then on the top of the ears.

We make a tightening on the face. We start from the bottom, insert the needle between the 2nd and 3rd rows and withdraw between the 11th and 12th rows. The distance between the eyes is 11-12 sc. Embroider eyelashes with sewing yarn.

On the head with the help of pins, carefully fix the flowers and leaves. Then we also sew, but before that I glue them with a small amount of glue.

The Spring bunny in dress is Ready !

More Amigurumi Ideas;