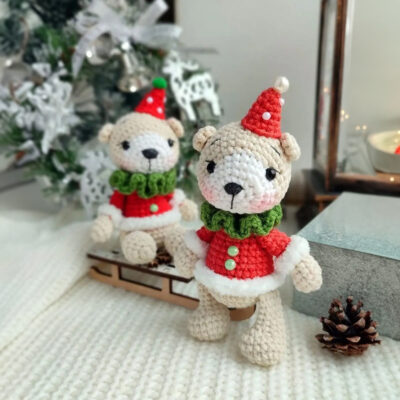
Hello dear amigurumi followers, we add a new one to the free amigurumi pattern. You can always follow us to reach the newest, most popular, most accurate pattern. Here is Amigurumi Winter Bear;

Designed and photos by @clubigrushkiamigurumi
Materials:
- Yarn: YarnArt Jeans (55% cotton, 45% acrylic, 50 g/160 m): #05 (beige), #90 (red), #01 (white), #69 (green); Alize Softy #55 (white)
- Hook size: 2.5 mm
- 6 mm half beads for eyes
- Black yarn for embroidery a nose, eyebrows and eyelashes
- Pearl beads for decoration
- Sewing needle, tapestry needle
- Dry pastel crayon or pink blush
- Scissors
- Fabric glue
- Stitch marker
- Fiberfill
Abbreviations:
R = row
mc = magic circle
ch = chain
sl st = slip stitch
sc = single crochet
dc = double crochet
inc = 2 sc in the next stitch
dec = single crochet 2 stitches together
F.o. = finish off
BLO = back loop only
FLO = front loop only
(12) = number of stitches you should have at the end of the round/row
( )*6 = repeat whatever is between the brackets the number of times stated
Free amigurumi bear pattern
Head
Stuff as you go.
Start with white yarn:
R 1: 6 sc in mc (6)
R 2: (inc)*6 (12)
R 3: (3 sc in one st)*3, 3 sc, (3 sc in one st)*3, 3 sc (24)
R 4-5: 24 sc (2 rows)
Change to beige yarn:
R 6: (3 sc, inc)*6 (30)
R 7: 2 sc, inc, (4 sc, inc)*5, 2 sc (36)
R 8-13: 36 sc (6 rows)
R 14: 2 sc, dec, (4 sc, dec)*5, 2 sc (30)
R 15: (3 sc, dec)*6 (24)
R 16: 1 sc, dec, (2 sc, dec)*5, 1 sc (18)
R 17: (1 sc, dec)*6 (12)
R 18: (dec)*6 (6)
F.o.

Ears (make 2)
With beige yarn:
R 1: 7 sc in mc (7)
R 2: 7 sc
F.o. and leave a long tail for sewing.
Eye tightening
Mark the eye points:
Points #1 and #2 are located between R 5 and R 6 at the distance of 8-9 stitches from each other.
Take a long needle with strong thread, make a knot at the end of the thread. Insert the needle in the bottom of the head and pull out in point #1. Insert the needle in one sc left from the point #1 and pull out in the bottom of the head. Pull slightly.
Glue half beads for eyes, embroider a nose, eyelashes and eyebrows. Tint cheeks using a pink pastel crayon or pink blush.
Sew the ears on the head.


Arms (make 2)
Start with beige yarn:
R 1: 6 sc in mc (6)
R 2: (inc)*6 (12)
R 3: 12 sc
R 4: 4 sc, 2 dec, 4 sc (10)
R 5: 3 sc, 2 dec, 3 sc (8)
R 6: 8 sc
Change to red yarn:
R 7: BLO: 8 sc
R 8-11: 8 sc (4 rows)
Stuff gently 1⁄2 full.
Fold top of arm flat and 4 sc through both sides across.
F.o.
Attach Alize Softy yarn to the front loop of R 6 of the arm.
Crochet in FLO: 8 sc
F.o.
Legs (make 2)
With beige yarn:
R 1: 6 sc in mc (6)
R 2: (3 sc in one st)*2, 1 sc, (3 sc in one st)*2, 1 sc (14)
R 3: (2 sc, inc)*2, 1 sc, (2 sc, inc)*2, 1 sc (18)
R 4-5: 18 sc (2 rows) + 4 sc to the center
R 6: 3 sc, 6 dec, 3 sc (12)
R 7: 3 sc, 3 dec, 3 sc (9)
R 8-11: 9 sc (4 rows)
Stuff gently 1⁄2 full.
Fold top of leg flat and 4 sc through both sides across.
F.o.

Body
Stuff as you go.
Start with beige yarn:
R 1: 6 sc in mc (6)
R 2: (inc)*6 (12)
R 3: (1 sc, inc)*6 (18)
R 4: 1 sc, inc, (2 sc, inc)*5, 1 sc (24)
R 5: (3 sc, inc)*6 (30)
In the next row we will crochet the legs on.
R 6: 6 sc, 4 sc together with sc of the 1st leg, 11 sc, 4 sc together with sc of the 2nd leg, 5 sc (30)
R 7: 30 sc
Change to red yarn:
R 8: BLO: 30 sc
R 9: 30 sc
R 10: (3 sc, dec)*6 (24)
R 11-12: 24 sc (2 rows)
R 13: 1 sc, dec, (2 sc, dec)*5, 1 sc (18)
R 14: 18 sc
In the next round we will crochet the arms onto the body.
R 15: 4 sc, 4 sc together with sc of the 1st arm, 5 sc, 4 sc together with sc of the 2nd arm, 1 sc (18)
R 16: 18 sc
Change to beige yarn:
R 17: (1 sc, dec)*6 (12)
R 18: 12 sc
F.o. and leave a long tail for sewing.

Attach Alize Softy yarn to the front loop of R 7 of the body.
Crochet in FLO: 30 sc
F.o.
Sew the head to the body.
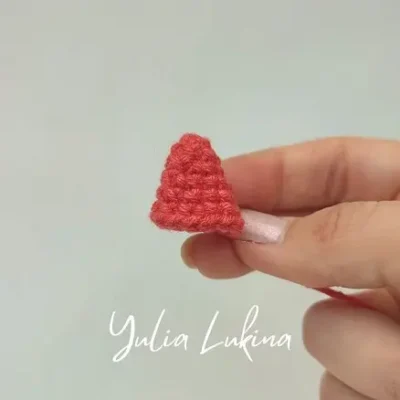
Hat
With red yarn:
R 1: 6 sc in mc (6)
R 2: 6 sc
R 3: (1 sc, inc)*3 (9)
R 4: 1 sc, inc, (2 sc, inc)*2, 1 sc (12)
R 5: 12 sc
R 6: (3 sc, inc)*3 (15)
F.o. and leave a long tail for sewing.
Sew the hat on the head. Sew pearl beads on the hat.

Collar
With green yarn:
Make 18 ch.
R 1: From the 3rd ch from hook: 3-4 dc in every st to the end of row
F.o. and leave a long tail for sewing.

Try on the collar, sew the two collar ends together on the neck.
Finish Amigurumi Winter Bear.
More Amigurumi Ideas;

