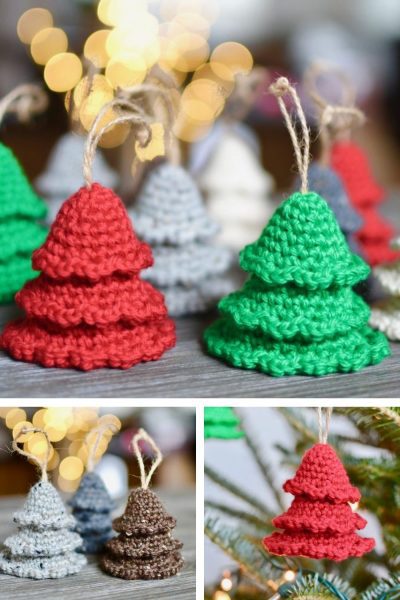

Hello dear amigurumi followers, we add a new one to the free amigurumi pattern. You can always follow us to reach the newest, most popular, most accurate pattern. Here is Rustic Tree Ornaments Crochet;

Rustic Tree Ornaments Pattern Essentials
Techniques
- Magic Circle
- Single Crochet
- Single Crochet Increase
- Slip Stitch
- Fasten Off
- Seamless Join
Abbreviations
- sc – single crochet
- st/sts – stitch(es)
- inc – increase (2 single crochet in the next stitch)
- sl st – slip stitch
- R1- round 1
- ( ) – repeat this group of stitches
Rustic Tree Ornaments Pattern Example
6 sc in a Magic Circle {6 sts}
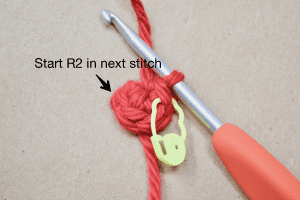
R1 starts with 6 single crochet into a magic circle
Alternate way to begin: chain 2, sc 6 times in 2nd chain from hook {6 sts}
(inc, sc in next 2 sts) 2 times {8 sts}
(2 single crochets in stitch, then single crochet in the next 2 stitches) – repeat that sequence a total of 2 times for a total of 8 stitches
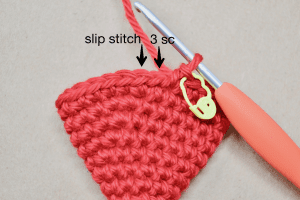
(3 sc in next st, sl st in next st) 13 times {52 sts}
(3 single crochets in stitch, then slip stitch in the next stitch) – repeat that sequence a total of 13 times for a total of 52 stitches
Bottom Layer
- R1: 6 sc in a Magic Circle {6 sts}
- R2: (inc, sc in next 2 sts) 2 times {8 sts}
- R3: (inc, sc in next 3 sts) 2 times {10 sts}
- R4: (inc, sc in next 4 sts) 2 times {12 sts}
- R5: (inc, sc in next 5 sts) 2 times {14 sts}
- R6: (inc, sc in next 6 sts) 2 times {16 sts}
- R7: (inc, sc in next 7 sts) 2 times {18 sts}
- R8: (inc, sc in next 8 sts) 2 times {20 sts}
- R9: (inc, sc in next 9 sts) 2 times {22 sts}
- R10: (inc, sc in next 10 sts) 2 times {24 sts}
- R11: (inc, sc in next 11 sts) 2 times {26 sts}
- R12: (3 sc in next st, sl st in next st) 13 times {52 sts}
- Fasten off and weave in all ends. Set the piece aside until assembly.


MIDDLE LAYER
- R1: 6 sc in a Magic Circle {6 sts}
- R2: (inc, sc in next 2 sts) 2 times {8 sts}
- R3: (inc, sc in next 3 sts) 2 times {10 sts}
- R4: (inc, sc in next 4 sts) 2 times {12 sts}
- R5: (inc, sc in next 5 sts) 2 times {14 sts}
- R6: (inc, sc in next 6 sts) 2 times {16 sts}
- R7: (inc, sc in next 7 sts) 2 times {18 sts}
- R8: (inc, sc in next 8 sts) 2 times {20 sts}
- R9: (inc, sc in next 9 sts) 2 times {22 sts}
- R10: (3 sc in next st, sl st in next st) 11 times {44 sts}
- Fasten off and weave in all ends. Set the piece aside until assembly.
Top Layer
- R1: 6 sc in a Magic Circle {6 sts}
- R2: (inc, sc in next 2 sts) 2 times {8 sts}
- R3: (inc, sc in next 3 sts) 2 times {10 sts}
- R4: (inc, sc in next 4 sts) 2 times {12 sts}
- R5: (inc, sc in next 5 sts) 2 times {14 sts}
- R6: (inc, sc in next 6 sts) 2 times {16 sts}
- R7: (inc, sc in next 7 sts) 2 times {18 sts}
- R8: (3 sc in next st, sl st in next st) 9 times {36 sts}
- Fasten off and weave in all ends. Now with your bottom, middle, and top layers complete, you can assemble the final tree.
Assembly
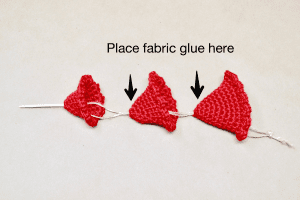


- Insert needle through the middle of the medium tree and then the small tree (from inside – out).
- Decorate your tree!
More Amigurumi Ideas;