Hello dear amigurumi followers, we add a new one to the free amigurumi pattern. You can always follow us to reach the newest, most popular, most accurate pattern. Here is Crochet Super Mario;

Designer: aradiyatoys
Materials
• 0.75 and 1.00 mm hook
• Flesh-colored, navy blue, brown, terracotta, dark brown, yellow, red, white and black yarn
• Sewing needle
• Stuffing material
Abbreviations
Ch– chain
Sc– single crochet
Dc– Double crochet
Tr– Treble crochet
Hdc– half double crochet
Slst– slip stitch
Inc– increase
Incdc– increase with dc
Inctr– increase with tr
Invdec– invisible decrease
Tr invdec– treble invisible decrease
BLO– back loops only
FLO– front loops only
Tip: The toy must be crocheted with tight stitches, to be sure that there won’t be any holes through which stuffing material can be seen.
Tip: To keep track of the row, use a marker. Pin marker to the last loop of the row. Every new row must be finished with a loop at the marker. All amigurumi toys are crocheted with tight stitches. Avoid small holes when stretching crochet fabric, if there are some tiny holes, use a smaller size hook. To avoid seams, all details are crocheted in a spiral without slip stitch and lifting loops. There is a chance that you will lose the beginning of the row; to avoid this, use a marker. It can be a colored pin or thread of contrasting color
Head
With flesh-colored yarn, 1.00 mm hook
Rnd 1. 6 sc in magic circle (6)
Rnd 2. 6 inc (12)
Rnd 3. (1sc, inc) repeat 6 times (18)
Rnd 4. (2sc, inc) repeat 6 times (24)
Rnd 5. (3sc, inc) repeat 6 times (30)
Rnd 6. (4sc, inc) repeat 6 times (36)
Rnd 7. (5sc, inc) repeat 6 times (42)
Rnd 8. (6sc, inc) repeat 6 times (48)
Rnd 9. (7sc, inc) repeat 6 times (54)
Rnd 10. (8sc, inc) repeat 6 times (60)
Rnd 11. (9sc, inc) repeat 2 times, 20 sc, (9sc, inc) repeat 2 times (64)
Rnd 12-22. sc in each sc around (64)
Rnd 23. (9sc, invdec) repeat 2 times, 20sc, (9sc, invdec) repeat 2 times (60)
Rnd 24. (8sc, invdec) repeat 6 times (54)
Rnd 25. (7sc, invdec) repeat 6 times (48)
Rnd 26. (6sc, invdec) repeat 6 times (42)
Rnd 27. (5sc, invdec) repeat 6 times (36)
Rnd 28. BLO (4sc, invdec) repeat 6 times (30)
Stuff detail with stuffing material, continue crocheting.
Rnd 29. (3sc, invdec) repeat 6 times (24)
Rnd 30. (2sc, invdec) repeat 6 times (18)
Rnd 31. (1sc, invdec) repeat 6 times (12)
Rnd 32. 6 invdec (6), slst
Cut the yarn.
Tip: To avoid uneven edges, all detail that are made in spiral technique must be finished with a slip stitch.

Body
With red yarn, 1.00 mm hook
Connect yarn to the 28th row where you crocheted back loops only.
Rnd 1. 36 sc (36)
Rnd 2. (11sc, inc) repeat 3 times (39)
Rnd 3. 55sc, inc, 12sc, inc, 12sc, inc, 7sc (42)
Rnd 4. (13sc, inc) repeat 3 times (45)
Rnd 5. sc in each sc around (45)
Rnd 6. 6sc, inc, 14sc, inc, 14sc, inc, 8sc (48)
Rnd 7-8. sc in each sc around (48)
Connect navy blue yarn and cut red one.
Rnd 9-11. sc in each sc around (48)
Rnd 12. 6sc, invdec, 14sc, invdec, 14sc, invdec, 8sc (45)
Rnd 13. (13sc, invdec) repeat 3 times (42)
Rnd 14. (5sc, invdec) repeat 6 times (36)
Rnd 15. (4sc, invdec) repeat 6 times (30)
Stuff detail with stuffing material, continue crocheting.
Rnd 16. (3sc, invdec) repeat 6 times (24)
Rnd 17. (2sc, invdec) repeat 6 times (18)
Rnd 18. (1sc, invdec) repeat 6 times (12)
Rnd 19. 6 invdec (6), slst
Tighten all stitches. Cut the yarn, hiding the end inside the body.

Overalls
With navy blue yarn, 1.00 mm hook
Rnd 1. 6 sc in magic circle (6)
Rnd 2. 6 inc (12)
Rnd 3. (1sc, inc) repeat 6 times (18)
Rnd 4. (2sc, inc) repeat 6 times (24)
Rnd 5. (3sc, inc) repeat 6 times (30)
Rnd 6. (4sc, inc) repeat 6 times (36)
Rnd 7. (5sc, inc) repeat 6 times (42)
Rnd 8. (6sc, inc) repeat 6 times (48)
Rnd 9-16. sc in each sc around (48)
Rnd 17-19. 14sc, ch turn (14)
Rnd 20. 14sc (14)
Cut the yarn, leave a long end for sewing. Skip 10 stitches, connect navy blue yarn to the 11th stitch and crochete 1sc, 13sc, ch turn (the first row is ready).
Rnd 2-3. 14sc, ch turn (14)
Rnd 4. 14sc (14)
Cut the yarn, leave a long end for sewing.

Overalls Straps
With navy blue yarn, 1.00 mm hook
Ch 19
Rnd 1. sc in the second stitch, 17sc (18)
Cut the yarn, leave a long end for sewing. Make 2 details.

Legs
With brown yarn, 1.00 mm hook
Rnd 1. 6sc in magic circle (6)
Rnd 2. 6 inc (12)
Rnd 3. (1sc, inc) repeat 6 times (18)
Rnd 4. sc in each around (18)
Rnd 5. 5sc, 4 invdec, 5sc (14)
Rnd 6. 5sc, ch turn (5)
Rnd 7. 11sc, ch turn (11)
Rnd 8. 11sc, ch turn (11)
Rnd 9. 11sc, ch turn (11)
Rnd 10. 1sc, 5 invdec, ch turn (6)
Rnd 11. 3 invdec, ch turn (3)
Rnd 12. tr invdec (1)
Rnd 13. Crochet around 16sc (16)
Connect navy blue yarn and cut brown one.
Rnd 14. BLO sc in each sc around (16)
Rnd 15. 3sc, inc, 8sc, inc, 3sc (18)
Starting from the 16th row, the patterns for crocheting the left and the right legs are different.
Left leg
Rnd 16. 1sc, 1hdc, 4dc, 1hdc, 11sc (18)
Rnd 17. 1sc, 6hdc, 1sc, 10 slst (18)
Right leg
Rnd 16. 11sc, 1hdc, 4dc, 1hdc, 1sc (18)
Rnd 17. 10 slst, 1sc, 6hdc, 1sc (18)
Cut the yarn, leave a long end for sewing.
Make left and right legs.
Connect navy blue yarn to the last stitches of the 14th row where you crocheted back loops only and crochet
Rnd 18. 15sc, inc (17), slst
Cut the yarn, hiding the end on the back side of the detail.
Stuff detail with stuffing material.
Repeat with the second leg.

Sole
With terracotta yarn, 1.00 mm hook
Ch 5
Rnd 1. sc in second stitch, 3sc, ch turn (4)
Rnd 2. inc, 2sc, inc, ch turn (6)
Rnd 3-6. 6sc, ch turn (6)
Rnd 7. invdec, 2sc, invdec, ch turn (4)
Rnd 8. 4sc (4)
Crochet the whole circumference of the detail, making 21sc. Cut the yarn, leave a long end for sewing.

Mustache
With dark brown yarn, 1.00 mm hook
Right part
Ch 10
Rnd 1. incdc in third stitch, 1dc, slst, inctr, 1tr, slst, 1hdc, 1sc (10)
Left part
Ch10
Rnd 1. sc in second stitch, 1hdc, slst, 1tr, inctr, slst 1dc, incdc, slst (10)
Cut the yarn, leave a long end for sewing.

Fingers
With white yarn, 0,75 mm hook
Thumb
Rnd 1. 6sc in magic circle (6)
Rnd 2-3. sc in each sc around (6), slst
Cut the yarn. Make 2 details.
Little finger
Rnd 1. 4sc in magic circle (4)
Rnd 2-3. sc in each sc around (4), slst
Cut the yarn. Make 2 details.
Middle finger
Rnd 1. 5sc in magic circle (5)
Rnd 2-4. sc in each sc around (5)
Rnd 5. 3sc (3), slst
Cut the yarn. Make 2 details.
Ring finger
Rnd 1. 5sc in magic circle (5)
Rnd 2-4. sc in each sc around (5), slst
Cut the yarn. Make 2 details.
Forefinger
Rnd 1. 5sc in magic circle (5)
Rnd 2-4. sc in each sc around (5)
Do not cut the yarn. Make 2 details. Ring finger and forefinger are crocheted in the same way, the only difference is that you need to cut the yarn on the ring finger, but leave the yarn on forefinger for connecting other fingers.

Arms
The first row is crocheted in the same way for the left and right hands.
With white yarn, 0,75 mm hook
Rnd 1. forefinger: 2sc,
middle 2sc,
ring finger: 2sc,
little finger: 4sc,
ring finger: 2sc (1 stitch should be left uncrocheted),
middle finger: 2sc (1 stitch should be left uncrocheted)
forefinger: 3sc (17)
The patterns for the left and right arms are different starting from the second row.
Left arm
Rnd 2. connect thumb 1sc, 4sc, invdec, 2sc, invdec, 6sc (15)
Rnd 3. 4sc, o thumb (skip 3 stitches: 1sc on the thumb itself, the connection loop between the thumb and the forefinger that was mentioned as 1sc in the second round and 1sc on the forefinger), 13sc (17)
Rnd 4. 3sc, invdec, 3sc, invdec, 1sc, invdec, 2sc, invdec (13)
Rnd 5. 4sc (extra stitches made to help conceal the unshapely edges) (4)
Connect red yarn and cut white one.
Rnd 6. BLO sc in each sc around (13)
Rnd 7-12. sc in each sc around (13)
Stuff detail with stuffing material, continue crocheting.
Rnd 13. (1sc, invdec) repeat 4 times, 1sc (9)
Rnd 14. 1sc, 4 invdec (5), slst
Cut the yarn, leave a long end for sewing.
Connect white yarn to the row where you crocheted back loops only.
Rnd 1. (2sc, inc) repeat 4 times, inc (18), slst
Cut the yarn, hiding the end on the back side of the detail.
Right arm
Rnd 2. 5sc, invdec, 2sc, invdec, 4sc, connect thumb 1sc, 1sc (15)
Rnd 3. 12sc, (skip 3 stitches: 1sc on the forefinger, the connecting loop between the thumb and forefinger that was mentioned as 1sc in the second round and 1sc on the thumb itself), 4sc by thumb, 1sc (17)
Rnd 4. invdec, 2sc, invdec, 1sc, invdec, 3sc, invdec, 3sc (13)
Rnd 5. 8sc (extra stitches made to help conceal the unshapely edges ) (8)
Connect red yarn and cut white one.
Rnd 6. BLO sc in each sc around (13)
Rnd 7-12. sc in each sc around (13)
Stuff detail with stuffing material, continue crocheting.
Rnd 13. (1sc, invdec) repeat 4 times, 1 sc (9)
Rnd 14. 1sc, 4 invdec (5), slst
Cut the yarn, leave a long end for sewing.
Connect white yarn to the row where you crocheted back loops only.
Rnd 1. (2sc, inc) repeat 4 times, inc (18), slst
Cut the yarn, leave a long end for shaping fingers.

Cap
With red yarn, 1,00 mm hook
Rnd 1. 6 sc in magic circle (6)
Rnd 2. 6 inc (12)
Rnd 3. (1sc, inc) repeat 6 times (18)
Rnd 4. (2sc, inc) repeat 6 times (24)
Rnd 5. (3sc, inc) repeat 6 times (30)
Rnd 6. (4sc, inc) repeat 6 times (36)
Rnd 7. (5sc, inc) repeat 6 times (42)
Rnd 8. (6sc, inc) repeat 6 times (48)
Rnd 9. (7sc, inc) repeat 6 times (54)
Rnd 10. sc in each around (54)
Rnd 11. (8sc, inc) repeat 6 times (60)
Rnd 12. sc in each sc around (60)
Rnd 13. (9sc, inc) repeat 6 times (66)
Rnd 14-16. sc in each sc around (66)
Rnd 17. (9sc, invdec) repeat 6 times (60), slst
Cut the yarn

Cap Visor
With red yarn, 1,00 mm hook
Ch20
Rnd 1. sc in second stitch, 18sc, ch turn (19)
Rnd 2. 19sc, ch turn (19)
Rnd 3. invdec, 15sc, invdec, ch turn (17)
Rnd 4. 17sc, ch turn (17)
Rnd 5. invdec, 13sc, invdec (15)
Crochet the whole circumference of the cap visor adding the angles.
Rnd 6. 1sc in the last stitch of the 5th row, 4sc (into transverse loop), 3ch, sc in second stitch, 1hdc, 1sc (in the same stitch from which we crocheted chain of 3 ch’s, 17 slst
Scheme of crocheting the angles
Rnd 6. Continue 1sc, 3ch, sc in second stitch, 1hdc, 1sc (in the same
stitch from which we crocheted chain of 3ch’s, 4sc, inc, 14sc, slst
Cut the yarn, leave a long end for sewing.
Put the cap visor to the last row of the cap. Mark the farthest points on the cap visor and cap with pins. Do not sew the cap visor to the cap stitch to stitch, the count of stitches of both of them should not match. Count stitches on the cap visor and cap between pins and sew them together evenly. Start sewing from the stitches on the back side. Then on the front Cut the yarn, leave a long end for sewing.


Symbol
With white yarn, 1,00 mm hook
Rnd 1. 6sc in magic circle (6)
Rnd 2. 6 inc (12)
Rnd 3. (1sc, inc) repeat 6 times (18), slst
Cut the yarn, leave a long end for sewing.

Nose
With flesh-colored yarn, 1.00 mm hook
Rnd 1. 6sc in magic circle (6)
Rnd 2. 6 inc (12)
Rnd 3. (1sc, inc) repeat 6 times (18)
Rnd 4-6. Sc in each Sc around (18)
Stuff detail with a little stuffing material, continue crocheting
Rnd 7. (1sc, invdec) repeat 6 times (12)
Rnd 8. 6 invdec (6), slst
Cut the yarn, leave a long end for sewing.

Ears
With flesh-colored yarn, 1.00 mm hook
Rnd 1. 6sc in magic circle (6)
Rnd 2. (1sc, inc) repeat 3 times (9)
Rnd 3-4. Sc in each sc around (9)
Rnd 5. (1sc, invdec) repeat 3 times (6), slst
Cut the yarn, leave a long end for sewing. Make 2 details.

Side Whiskers
With brown yarn, 1.00 mm hook
Ch8
Rnd 1. sc in second stitch, Slst, 1tr, inctr, slst, 1tr, inctr (9)
Cut the yarn, leave a long end for sewing. Make 2 details, flip one of them.

Eyes
With double black yarn, 1.00 mm hook
Rnd 1. 5sc in magic circle (5), slst
Cut the yarn, leave a long end for sewing. Make 2 details.

Buttons
With yellow yarn, 1.00 mm hook
Rnd 1. 6sc in magic circle (6), slst
Cut the yarn, leave a long end for sewing. Make 2 details.

Assembly
At the beginning, we need to find the exact center of Mario’s face. Rotate the body to the color changes. Look
at the stitch where flesh-colored yarn is replaced with red yarn. Starting from this stitch, go 5 rows up, step 1 stitch to the right and mark this place with a pin. Count 34 stitches to the left from this pin . That will be the center of the face, mark it with a pin, remove all previously inserted pins. Do not remove this pin until the nose is sewn. Put the overalls onto the body, adjusting them according to where the center of the face is, and fasten them with pins.

1.Place the sole to the bottom part of the boot so that their edges match and fasten them with pins. Sew the sole with the end of terracotta yarn that we left before. Fasten and cut the yarn, hiding the end inside the leg. Repeat with the second sole.

2. Place the legs symmetrically to the bottom part of the overalls and fasten them with pins. Sew the legs with the ends of navy blue yarn that we left before. Fasten and cut the yarn, hiding the end inside the body. Place the legs so that Mario can stand.

3. Remove the pin that marked the center of the face. Place the nose a little lower than the center of the face and fasten it with pins. Sew the nose, making a seam around the circumference. Fasten and cut the yarn, hiding the end inside the head. Place 2 mustache parts symmetrically under the nose and fasten them with pins. Sew them along the top edge, the bottom edge of the mustache should not be sewn. Fasten and cut the yarn, hiding the end inside the head.

4. Place the symbol to the center of the cap and sew it with the end of white yarn that we left before. Cut the yarn, hiding the end on the back side of the detail. Embroider the letter «M» at the center of the symbol with red yarn. Try the cap on. The cap visor should sit 4 rows higher than the nose. Mark this row with pins and remove the cap.

5. Place the side whiskers, adjusting them along the marked area where the cap should sit. The top part of the side whiskers should touch the cap. Three stitches should remain between the edge of the mustache and each side whisker. Sew the side whiskers along their straight side with the end of brown yarn that we left before. The other side should not be sewn.
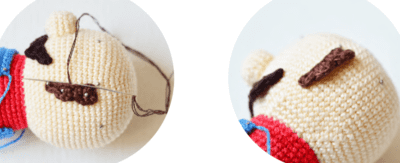
6. Bend the side whiskers a little and place the ears a little lower symmetrically. Fasten them with pins. Sew the ears with the end of fleshcolored yarn that we left before. Fasten and cut the yarn, hiding the end inside the head. Place the eyes symmetrically a bit higher than the nose and fasten them with pins. Sew the eyes with the end of black yarn that we left before. Embroider the eyebrows above the eyes with black yarn, a little lower than where the cap will be placed. Embroider sparkles, making a few stitches with white yarn on the edge of both eyes.

7. Remove the pins that you inserted earlier to mark the place for the cap. Put the cap on so that its visor is situated on the center a little higher than the eyebrows. Mark the point behind side whiskers from both sides. Remove the cap with these 2 pins still in, connect brown yarn and crochet the row of brown color along the back of the cap, going from the first to the second pin. I had 31Sc, but you will probably have another count of brown stitches. Cut the yarn, leaving a long end for sewing. Stuff the cap with a little stuffing material and put it on, making sure that the extremities of the brown row are placed right where the side whiskers end. Sew the cap to the head along the whole circumference keeping the color of yarn. All yarn must be fastened and hidden inside the head.

8. Take the right hand, guide the end of white yarn that we left before to the point on the hand that is marked with black color. Guide the yarn as shown on the photo, taking ring finger, little finger and thumb, then insert the needle through the palm to the back side of the hand. Pull the yarn, the fingers will bend. Fasten and cut the yarn, hiding the end inside the hand. Place the arms as shown on the photos and fasten them with pins. Keep Mario balanced.

9. Sew the arms with the ends of red yarn that we left before. Fasten and cut the yarn, hiding the end inside the body. Place the overalls straps above the arms and fasten them with pins. Sew the straps with the end of navy blue yarn that we left before. Place the buttons to the front side of the straps and fasten them with pins. Sew the buttons with the end of yellow yarn that we left before.

Congratulations, your amigurumi Mario pattern is ready.

More Amigurumi Ideas;


