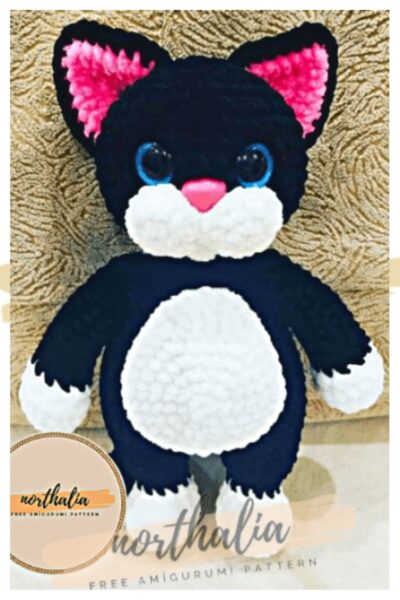
Hello dear amigurumi followers, we add a new one to the free amigurumi pattern. You can always follow us to reach the newest, most popular, most accurate pattern. Here is Crochet Plush Cat;
Designer: nastyakravchenko27
Materials
• Yarn Himalaya Dolphin Baby (black) 1 skein.
• Himalaya Dolphin Baby yarn (white) half hank.
• Himalaya Dolphin Baby yarn (pink No. 80309) a little from a skein.
• Filler (holofiber)
• Crochet hook No: 4 mm.
• Shiny eyes (blue color) 18 mm.
• Spout pink 18 mm.
• Dense threads for stitching parts (white and black).
Abbreviations
MR- magic ring
Ch- chain
Sc- single crochet
Inc- increase
Dec- decrease
Sl st- slip stitch
Hdc- half double crochet
Dc- double crochet
Legs
The legs are the body. Let’s start with the legs:
Start white:
Rnd 1. 6 sc in MR
Rnd 2. 6 inc (12)
Rnd 3. (1sc, inc)*6 (18)
Rnd 4-6. 18 sc
Rnd 7. 2sc, 5dec, 2sc, 1dec, 2sc (12)
Rnd 8. 12 sc
Rnd 9. color change to black 12 sc
Rnd 10-11. 12 sc
Rnd 12. (1sc, inc)*6 (18)
Rnd 13-15. 18 sc
1. Left leg: fasten, cut, hide the thread.
2. Right leg: crochet 4 sc, and continue to crochet the body from the right leg. Dial 2 ch put off the right leg, take the left. On the left leg from the end of the row (back), we count 4 sc and in the 4th we attach the right leg, crocheting 1 sc, we continue to crochet the 16th row:
Rnd 16. 18sc, 2sc in a chain of ch, 19sc, 2sc in a chain of ch, 1sc (42)
Rnd 17. (6sc, inc)*6 (48)
Rnd 18-24. 48 sc (7 rnds)
Rnd 25. (6sc, dec)*6 (42)
Rnd 26. 42 sc
Rnd 27. (5sc, dec)*6 (36)
Rnd 28-30. 36 sc we begin to fill the legs and body
Rnd 31. (4sc, dec)*6 (30)
Rnd 32-33. 30 sc
Rnd 34. (3sc, dec)*6 (24)
Rnd 35. 24 sc
Rnd 36. (2sc, dec)*6 (18)
Fasten the thread, cut off, hide. Legs and torso are ready.
Belly
White color.
Rnd 1. 6sc in MR
Rnd 2. 6 inc (12)
Rnd 3. (1sc, inc)*6 (18)
Rnd 4. (2sc, inc)*6 (24)
Rnd 5. (3sc, inc)*6 (30)
Rnd 6. (4sc, inc)*2, 4sc, inc from 1hdc and 1dc, 4dc, inc from 1dc and 1hdc, (4sc,inc)*2 (36)
Rnd 7. 36 sc
Tail
Start white.
Rnd 1. 6sc in MR
Rnd 2. (1sc, inc)*3 (9)
Rnd 3-5. 9 sc (3 rnds)
Rnd 6-23. Black color 9 sc.
The tail is ready.
Head
Rnd 1. 6sc in MR
Rnd 2. 6 inc (12)
Rnd 3. (1sc, inc)*6 (18)
Rnd 4. (2sc, inc)*6 (24)
Rnd 5. (3sc, inc)*6 (30)
Rnd 6. (4sc, inc)*6 (36)
Rnd 7. (5sc, inc)*6 (42)
Rnd 8-13. 42 sc (6 rnds)
Rnd 14. (5sc, dec)* (36)
Rnd 15. (4sc, dec)*6 (30)
Rnd 16. (3sc, dec)*6 (24)
Rnd 17. (2sc, dec)*6 (18)
Fasten the thread, cut off, hide. The head is ready.
Between 10 and 11 rows we insert eyes, the distance between the eyes is 6 sc.
Between the 12th and 13th rows we insert the spout.
Muzzle
White color.
Rnd 1. 6 sc in MR
Rnd 2. 6 inc (12)
Rnd 3. 12 sc
Crochet 2 parts together with two sl st.
Lower jaw: 3 ch.
Ears
First we knit two parts in white, and then in black.
We crochet in rotary rows.
Rnd 1. 5 sc in MR
Rnd 2. ch, 2sc, inc, from 3sc, 2sc
Rnd 3. ch, inc, 2sc, inc from 3sc, 2sc, inc
Rnd 4. ch, inc, 4sc, inc from 3sc, 4sc, inc
At the white triangles, cut the thread, fasten.
We do not cut the thread for black triangles, we fold the parts with the wrong side to each other, we tie sc without increments.
We do not tie the lower part of the ear! The ear is ready.
Paws
White first.
Rnd 1. 6 sc in MR
Rnd 2. 6 inc (12)
Rnd 3. 2sc, inc, (1sc, inc)*3, 3sc (16)
Rnd 4-5. 16 sc
Rnd 6. 3 sc, 4dec, 4sc (12)
Rnd 7-18. color change to black 12 sc.
At the end of the 18th row, we crochet another 2 sc, do not stuff the foot fully!!
Quite a bit at the beginning of the paw.
Fold the piece in half and crochet sc. Paws are ready.
We sew all the details!
Sew the ears at an angle to make them look more realistic!
More Amigurumi Ideas;