Hello Dear Amigurumi Followers
We add a new one to the free amigurumi patterns we have created for you. You can always get the most popular amigurumi patterns and the most preferred amigurumi crochet patterns on our site for free. Main crochets, amigurumi gazelles, amigurumi bears, amigurumi polar bears, amigurumi pandas, amigurumi penguins, amigurumi giraffes, amigurumi llama, amigurumi pigs, amigurumi rabbit, amigurumi clowns, amigurumi baby lambs, amigurumi lambs, amigurumi bees, amigurumi lambs dinosaurs, amigurumi elephants, amigurumi hippos, amigurumi monkeys, amigurumi cats, amigurumi dogs and more…
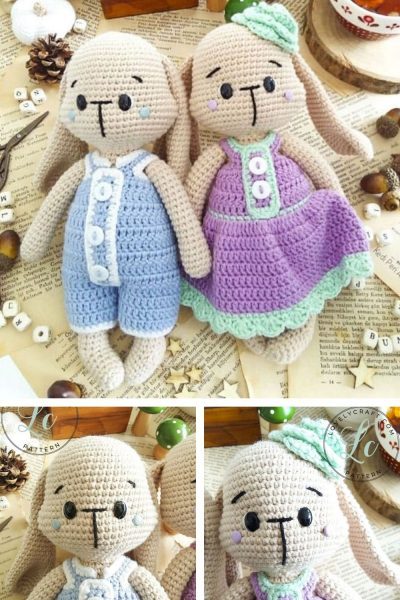
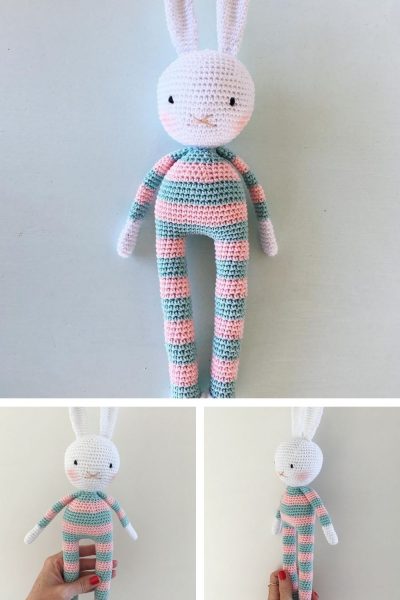
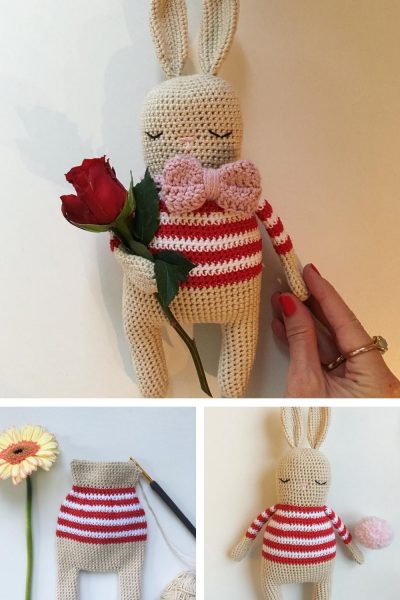
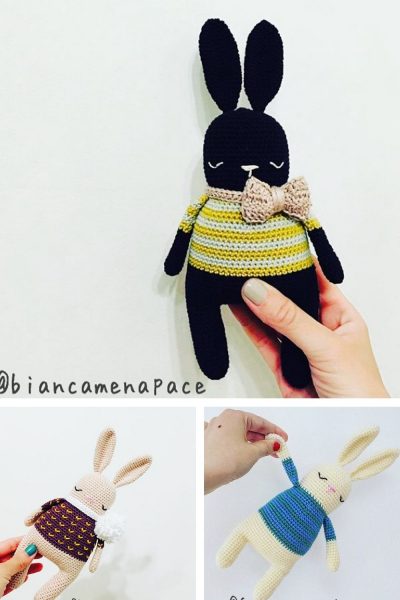
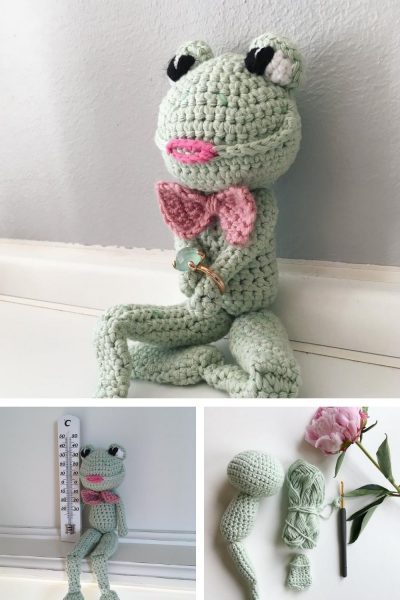
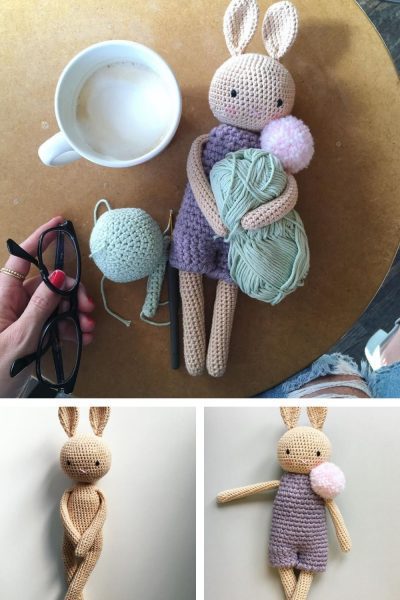
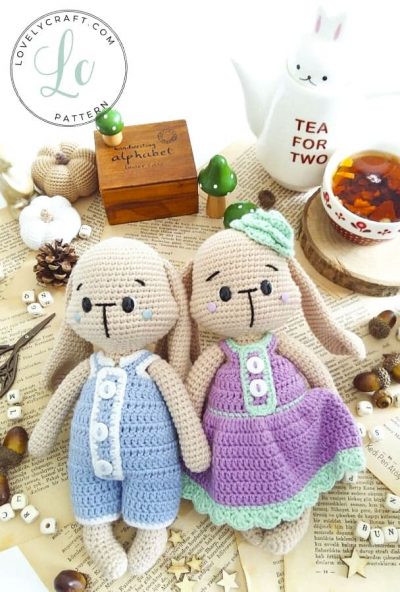
Our new free amigurumi crochet pattern Bunny.
Here is our pattern;
ABBREVIATIONS OF BASIC TERMS
ch: Chain
sc: Single Crochet
inc: Increase
dec: Decrease
slst: Slip Stitch
hdc: Half Double Crochet
dc: Double Crochet
st/sts: stitch/stitches
tr: Triple Crochet
BLO: Back Loops Only
FLO: Front Loops Only
Bobble: Bobble Stitch
( ): The parentheses at the end of therow give the total number of stitches of that round.
[ ]x.. : Repeatinstructions x times
FINISHED TOY IS AROUND 30cm HEIGHT.
Materials
Kartopu Amigurumi / Brown (Color code K855)
Kartopu Amigurumi / Blue (Color code K544)
Kartopu Amigurumi / White (Color code K010)
Kartopu Amigurumi / Purple (Color code K1709)
Kartopu Amigurumi / Green (Color code K507)
1 cm White Button (5 pcs)
7×10 mm Safety Eye (Black)
For embroidery: Black and white thread
Tong Fastener Pink / Blue (2 pcs)
Pins
Size 2.5mm or 3mm crochet hook
Scissors
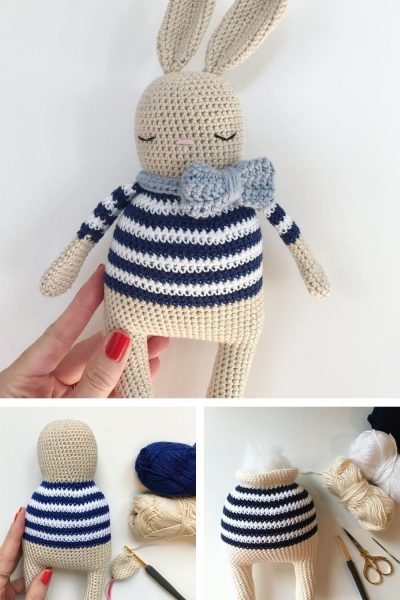
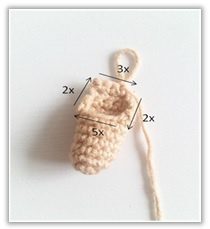
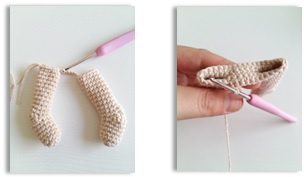
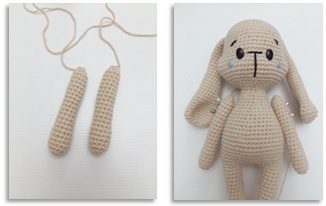
Legs (Use brown color and make 2)
Use a different color long yarn piece to mark beginning of round while crocheting legs.
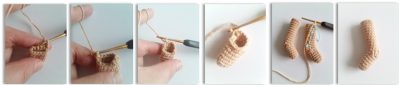
After 11th round foot part will take its shape. Then crochet st at its sideways and front section. After that, legs will be completed by crocheting sc in next 12 st between 12-22 rounds.
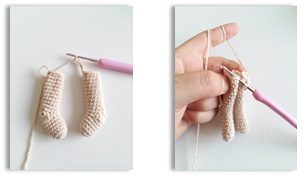
When first leg is finished, fasten off and crochet second leg. After second leg finished do not fasten off yarn and join two legs with chain. Then continue crochet the body part.
Start with legs. After crocheting front foot part of leg, at 8th round heel part will be crocheted. Lastly, after 11th round is completed rest of the rounds will be crocheted and legs will be completed.
Don’t forget following instruction images and notes!
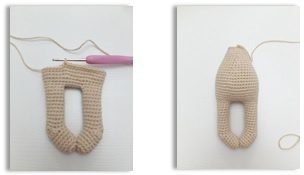
Join two legs and crochet the body as a single piece.
Rnd 1 Start 6sc in a magic ring and join with brown sl st (6) Please look through “Techniques Section” to learn about “Magic Ring” join with a slst. Do not forget to use your stitch marker.
Rnd 2 inc in all sts (12)
Rnd 3-7 sc in all 12 sts (5 rounds)
Make heel part
Rnd 8 Ch 1, turn, sc in next 7st (skip 1 st and go in 3rd st) (7)
Rnd 9 Ch 1, turn, sc in next 5st (skip 1 st and go in 3rd st) (5)
Rnd 10 Ch 1, turn, sc in next 3st (skip 1 st and go in 3rd st) (3)
Join foot part and crochet leg
Rnd 11 Ch 1, turn, sc in next 3st, (sideways) sc in next 2st, (in front) sc in next 5st, (sideways) sc in next 2st (12)
Rnd 12-22 sc in all 12 sts (11 rounds)
Body (Use brown color)
After crochet legs, start crocheting body part. Before joining legs make sure legs look toward inside.
While joining legs with chain, fold leg at the middle. When crochet up to waist part of body start filling polyester fiberfill. After body is finished fasten off and leave a long tail. Please follow instruction images!
Continue crochet the body with brown yarn.
Rnd 23 Ch 6 and join to legs (36)
Rnd 24 sc in all 36 sts
Rnd 25 [sc in the next 5 sts, inc] repeat 6 times (42)
Rnd 26 sc in all 42 sts
Rnd 27 [sc in the next 13 sts, inc] repeat 3 times (45)
Rnd 28 sc in all 45 sts
Rnd 29 [sc in the next 14 sts, inc] repeat 3 times (48)
Rnd 30-31 sc in all 48 sts (2 rounds)
Rnd 32 [sc in the next 14 sts, dec] repeat 3 times (45)
Rnd 33 sc in all 45 sts
Rnd 34 [sc in the next 13 sts, dec] repeat 3 times (42)
Rnd 35 sc in all 42 sts
Rnd 36 [sc in the next 5 sts, dec] repeat 6 times (36)
Rnd 37-38 sc in all 36 sts (2 rounds)
Rnd 39 [sc in the next 4 sts, dec] repeat 6 times (30)
Rnd 40 sc in all 30 sts
Rnd 41 [sc in the next 3 sts, dec] repeat 6 times (24)
Rnd 42-44 sc in all 24 sts (2 rounds)
Rnd 45 [sc in the next 2 sts, dec] repeat 6 times (18)
Rnd 46 sc in all 18 sts
Body is finished. Fasten off and leave a long tail.
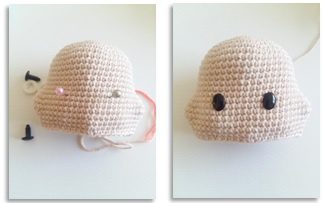
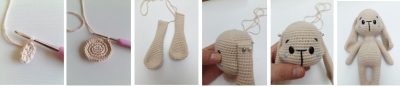
Head (Use brown color)
At head part, when reached the 17th round, start crocheting cheeks. There will be two protrusion at both side of head. Use a different color long yarn piece to mark beginning of round. Therefore you will increase and decrease stitches at right location.
After 23rd round, insert the safety eyes at this point. To find the center point fold the head at the center from cheek sides so safety eyes can be symmetrically inserted. After finish the head, fill the head with polyester fiberfill and continue with creating head form. Place the safety eyes between 17 and 18 with 9 stitches gap between them.
Please follow instructions images and all notes about crochet steps.
Rnd 1 start 6sc in a magic ring and join with brown sl st (6) Please look through “Techniques Section” to learn about “Magic Ring” join with a slst. Do not forget to use your stitch marker.
Rnd 2 inc in all sts (12)
Rnd 3 [sc in the next st, inc] repeat 6 times (18)
Rnd 4 [sc in the next 2 sts, inc] repeat 6 times (24)
Rnd 5 [sc in the next 3 sts, inc] repeat 6 times (30)
Rnd 6 [sc in the next 4 sts, inc] repeat 6 times (36)
Rnd 7 [sc in the next 5 sts, inc] repeat 6 times (42)
Rnd 8 [sc in the next 6 sts, inc] repeat 6 times (48)
Rnd 9-16 sc in all 48 sts (8 rounds)
Rnd 17sc in the next 9 sts, (inc) repeat 3 times, sc in the next 21 sts, (inc) repeat 3 times, sc in the next 12 sts (54)
Rnd 18 sc in the next 10st, inc, sc in the next 3st, inc, sc in the next 22st, inc, sc in the next 3st, inc, sc in the next 12st (58)
Rnd 19-20 sc in all 58 sts (2 rounds)
Rnd 21 sc in next 9st, (dec) repeat 4 times, sc in next 21st, (dec) repeat 4 times, sc in next 12 st (50)
Rnd 22 sc in next 10st, dec, sc in next 23st, dec, sc in next 13st (48)
Rnd 23 sc in all 48 sts
Rnd 24 [sc in the next 4 sts, dec] repeat 8 times (40)
Rnd 25 [sc in the next 3 sts, dec] repeat 8 times (32)
Rnd 26: [sc in the next 2 sts, dec] repeat 8 times (24)
Rnd 27 [sc in the next 1 sts, dec] repeat 6 times (18)
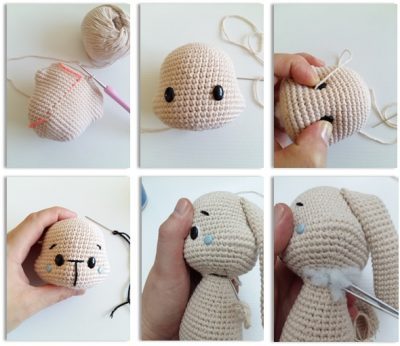
Shape the Head
Fill the head with fiber after eye-stitching and crochet. Get help from the visuals when filling fiber. Complete the filling process with fiber without disturbing the head form.
Then we will shape your face with your brown rope. Knot the end of the rope. Enter the lower part of the head with your needle and exit the lower part of the eye.
Do the same to the other eye through the loop next to it and fix the rope by moving the two eyes closer together. Tighten the rope between the two eyes several times.
This way it will be more robust.
You should pay attention to; Eyes should not be too close to each other. The average between two eyes can be two fingers wide.
After the end of this process, go to the edge of the eyes with a white rope and black rope with the black rope as in the visual nose, mouth, eyebrow process. Fasten the tongs to the cheeks.
If you don’t have a pin, you can use a pink rope to make a line-shaped cheek.
After the head is finished, we sew two parts with the long rope we left on the body part. There will be a gap between the body and the head while joining.
Fill the form with fiber and close it with stitches.
When the arms are in line 21, fill them with fiber. Then leave the rope long for sewing by completing the 22nd row. After sewing the mouth part of the arms, you can start sewing to the body.
The narrow parts of the arms will be sewn on the shoulder of the body with the outward facing. I mean, it’s gonna be three rows down the head.
Ears; 9-10. they will stand between the rows, on both sides of the head. The ears will not be filled with fibers. Connect the mouths with 6sc and erect.
Please follow up the instruction images.
Arms (Use brown color yarn and make 2)
Rnd 1 Start 6sc in a magic ring and join with cream slst. Use your stitch marker.
Rnd 2 inc in all sts (12)
Rnd 3-7 sc in all 12 sts (5 rounds)
Rnd 8 dec, sc in the next 4st, dec, sc in the next 4st (10)
Rnd 9-21 sc in all 10 sts (13 rounds)
Rnd 22 (dec) repeat 5 times (5)
Ear (Use brown color yarn and make 2)
Rnd 1 Ch 4
Rnd 2 Starting from the second stitch from the hook; sc in the next 2sts, sc 3 in the next stitch (these 3 single crochet stitches form a corner). Now you will work on the other side of the chain stitches; sc in the next 1sts, inc (8)
Rnd 3 inc in all sts (16)
Rnd 4 [sc in the next st, inc] repeat 8 times (24)
Rnd 5 [sc in the next 2 st, inc] repeat 8 times (32)
Rnd 6 sc in all 32 sts
Rnd 7 [sc in the next 2 st, dec] repeat 8 times (24)
Rnd 8 sc in all 24 sts
Rnd 9 dec, sc in the next 10 st, dec, sc in the next 10 st (22)
Rnd 10 sc in all 22 sts
Rnd 11 dec, sc in the next 9 st, dec, sc in the next 9 st (20)
Rnd 12 sc in all 20 sts
Rnd 13 dec, sc in the next 8 st, dec, sc in the next 8 st (18)
Rnd 14 sc in all 18 sts
Rnd 15 dec, sc in the next 7 st, dec, sc in the next 7 st (16)
Rnd 16-17 sc in all 16 sts (2 rounds)
Rnd 18 dec, sc in the next 6 st, dec, sc in the next 6 st (14)
Rnd 19 sc in all 14 sts
Rnd 20 dec, sc in the next 5 st, dec, sc in the next 5 st (12)
Rnd 21-30 sc in all 12 sts (10 rounds)
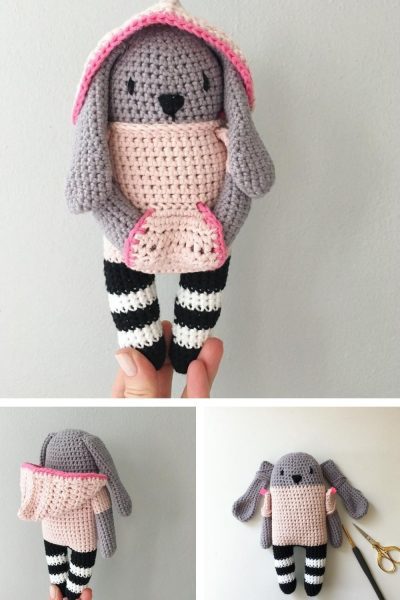
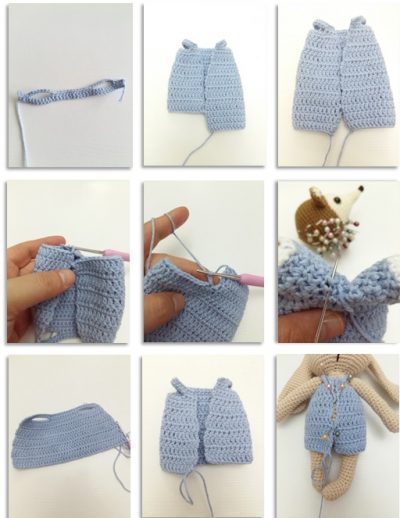
Pants (with blue color/ white yarn)
We start from the collar section. The trousers will also be separated from the network.
First one leg then the other leg. The opening in the net will be sewn with rope. Collar, sleeve and trousers are often sc with white rope.
The opening part will remain in front and will be sewn after being clothed in the body.
Please follow up the instruction images.
Rnd 1 Ch 35, slst
Rnd 2 Starting from the second stitch from the hook; sc in the next 34sts
Preparation of sleeve separation
Rnd 3 Ch 1, turn, sc in next 3st, ch 8 (skip 7st and go into the 8th st), sc in next 12st, ch 8 (skip 7st and go into the 8th st), sc in next 3st (18)
Rnd 4 Ch 1, turn, sc in next 34 st (34)
Rnd 5 Ch 2, turn, DCinc, dc in the next 32 sts, DCinc (36dc)
Rnd 6 Ch 2, turn, dc in next 36 st
Rnd 7 Ch 2, turn, [dc in the next 5 sts, DCinc] repeat 6 times (42dc)
Rnd 8 Ch 2, turn, dc in next 42 st
Rnd 9 Ch 2, turn, [dc in the next 6 sts, DCinc] repeat 6 times (48dc)
Rnd 10-15 Ch 2, turn, dc in next 48 st (6 rounds)
Split the pants from legs. After finish the first leg fasten off yarn and join the yarn with sl-st at other side for second leg. Do the same steps to create pants leg separations.
Rnd 16 dc in the next 24st, sl-st (24)
Rnd 17-18 Ch 2, dc in next 24st (2 rounds)
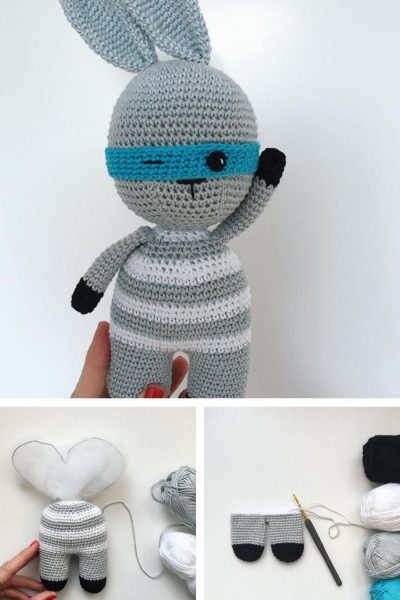
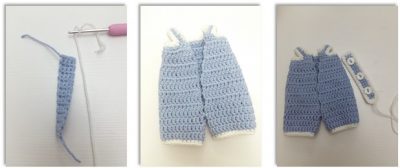
Mr. Bumble Jumpsuit Headband (with blue color/ white yarn)
After overalls, Mr. Bumble’a visuals, such as the front part of the dress to remain. Don’t forget to pass one row sc of white to the collar, sleeve and leg of the coverall.
Sew the buttons intermittently after tape construction is complete.
We sew the jumpsuit from the front with our blue rope. After locating the tape with marker pins, we sew the tape over the coverall.
Please follow up the instruction images.
Rnd 1 Ch 4
Rnd 2 Starting from the second stitch from the hook; sc in the next 3sts
Rnd 3-20 Ch 1, turn, dc in next 3 st (18 rounds)
We pass around the tape with a string of white rope and needles. In order not to stress the corner parts; Make 3 sc.
Mrs. Bumble Dress (with purple color/ green yarn)
After the dress is finished, we pass a row sc with green thread to the collar part.
We dress it so that the opening part stays ahead. We’re sewing buttons on the garment band.
We sew the purple thread on the remaining part of the garment and sew the band portion with markers.
For edge lace; ch 2 (at the beginning make ch and do not repeat later), yarn over the hook one
time and make dc in 2nd st. In same st make 5 dc. Then skip 1 st and sc in 2nd st.
Make 5 dc in same st, skip 1 st, sc in 2nd st. ….
Repeat as same order.
Please follow up the instruction images.
With purple colour
Crochet dress separately from body.
Rnd 1 Ch 32
Rnd 2 Starting from the second stitch from the hook; sc in the next 32sts
Preparation of sleeve separation
Rnd 3 Ch 1, turn, sc in next 3st, ch 8 (skip 7st and go into the 8th st), sc in next 12st, ch 8 (skip 7st and go into the 8th st), sc in next 3st (18)
Rnd 4 Ch 1, turn, sc in next 34 st
Rnd 5 Ch 2, turn, DCinc, dc in next 32 st, DCinc (36dc)
Rnd 6 Ch 2, turn, dc in next 36 st
Rnd 7 Ch 2, turn, [dc in the next 5 st, DCinc] repeats 6 times (42dc)
Rnd 8 Ch 2, turn, dc in next 42 st, slst
Dress(Use cream color)
Crochet dress separately from body.
Rnd 1: ch 35
Rnd 2: Start in the second chain from the hook, sc in 34ch (34)
Preparation of sleeve separation
Rnd 3: Ch 1, turn, sc in next 5st, ch 8 (skip 7st and go into the 8th st), sc in next 10st, ch 8 (skip 7st and go into the 8th st), sc in next 5st (36)
Rnd 4-5: Ch 1, turn, sc in next 36st (36)
Rnd 6-7. Ch2, turn, dc in next 36st (36)
Crochet body section of dress
Rnd 8: Ch 2, (dc, dc inc) repeat 18 times (54), slst
Rnd 9-10: Ch 2, (dc inc) repeat 54 times (108)
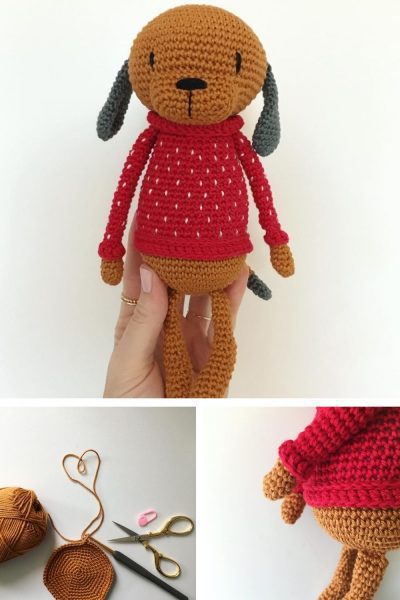
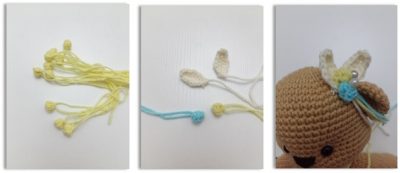
Bobble (with yellow color/ blue yarn and make 12)
A total of 11 yellow and 1 blue tiny balls will learn.
10 of them; Dress will be randomly tied on. 1 Yellow and 1 Blue; She’s gonna be standing over Mrs.Cookie.
Don’t forget to leave your rope long when starting Bobble Sticth. This will help you to throw the knot.
Ch4( the first chain stitch will be circle,the others will be counted as first dc), 1bobble stitch,slst.
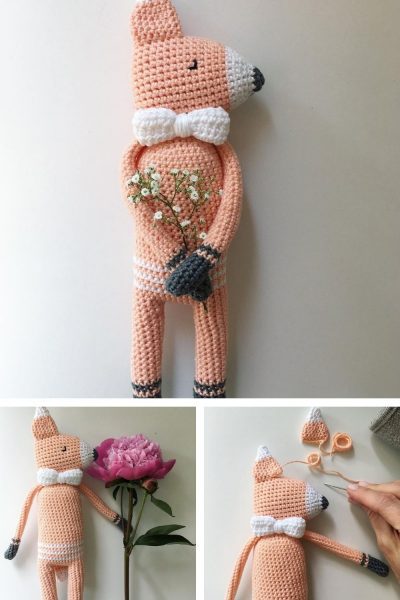
Ivy (with cream color yarn and make 2)
Chain 6, SC in 2nd chain from hook, HDC in next, DC in next two, make 6 DC in last chain. Now working on the other side of the chain, DC in next two, HDC in next, SC in last (do not join yet), chain 2 and make a SC in second chain from hook, join to first SC.
Tip: Use the invisible join to create a smooth edge.
More Amigurumi Ideas;